

A comprehensive guide to purchasing the best battery-powered chainsaw, with many useful tips on use and maintenance.
Purchasing Guide to Battery-Powered Electric Chainsaws,
Compiled and Edited by Real Wood Cutting Equipment Experts.
The constant development of battery-powered machines is prompting more and more people to switch from petrol-powered chainsaws to battery-powered ones, as more and more high-performance and valuable models are being produced.
These are a much more convenient and easy-to-use alternative to petrol-driven models, as they can be used wherever you want without worrying about their power supply, even in places where there is no power outlet.
CONTENTS
1. Introduction
In this guide we will go through all the main features of the Battery-powered Electric Chainsaws and the differences with their petrol-powered alternatives, but first a distinction should be made between the two main uses and types of chainsaws:
- Chainsaws for cutting;
- Chainsaws for pruning.


Chainsaws for cutting are larger in size and mount a much longer cutting bar; they are used for cutting medium to large logs and branches and for sawing logs on a stand.
Chainsaws for pruning, on the other hand, are smaller and more compact, and their main feature is that they can also be used with one hand.
They are used for all pruning-related tasks, and are therefore suitable for cutting small branches of fruit or olive trees.
A pruning chainsaw is immediately recognisable from a cutting chainsaw for one important feature: The handle.
In the pruning models it is located at the top, specifically so that the operator can also use the machine with one hand whenever possible.
Its placement, perfectly barycentric to the machine, in fact allows it to remain balanced even with just one hand supporting it in different positions.
IMPORTANT NOTE: As stated in all instruction manuals for the pruning chainsaw models, one-handed use is only recommended for professional users, i.e. operators who not only use the product professionally and continuously and have gained experience in its use, but who have perhaps also undergone training.
This is for safety reasons, as the electric saw is still a dangerous tool with an exposed cutting chain, and one-handed use increases risk by reducing grip and control of the machine during the cutting phase.
Therefore, one-handed use should be avoided for the inexperienced hobbyist user (all pruning chainsaws are however also regularly equipped with the second handle for two-handed use).


If you want to learn about all the features and assess the main aspects of pruning chainsaws read our guide specifically on this category.
2. The advantages of the battery
The continuous development and improvement of batteries and the machines they power have led this category to be the very first alternative to classic petrol chainsaws, especially for those who do not need extremely powerful machines and wish to use environmentally friendly alternatives.


We can sum up that the main aspects that distinguish them from their internal combustion ‘sisters’ are all related to the absence of a mixture engine.
While an internal combustion engine is more powerful, a battery-powered engine not only releases no harmful exhaust fumes for the environment and the operator himself, but is also much quieter and easier to operate.
The size also changes considerably, the battery-powered engine is much smaller and less bulky, which also affects the overall weight of the machine, battery-powered models in fact weigh less than petrol chainsaws.
Finally, maintenance work is also greatly reduced with batteries, as there are no parts that are prone to failure and require regular maintenance such as filters, spark plugs, engine oil or topping up with fuel.


Let us now list in a table the features and differences mentioned above, compared to petrol-driven models.
| Emission Level | Noise Level | Weight | Maintenance Level | |
| Battery-powered chainsaws | Zero | Low | Max. 5 kg | Low |
| Petrol chainsaws | Medium-High | High | Up to 8 kg | Medium-High |
The main type of battery now found in most equipment is the lithium battery, which differs from older generation batteries (e.g. nickel) in terms of:
- LONGER LIFE SPAN: Lithium batteries allow 3-4 times as many recharges as nickel batteries;
- FULL CHARGE THROUGHOUT: The charge of these batteries does not fade;
- LESSER WEIGHT: These batteries have a better power-to-weight ratio, being about 1/3 lighter than nickel batteries;
- ENVIRONMENTALLY-FRIENDLY: Tools with lithium-ion batteries are recyclable and free of heavy metals;
- ZERO MEMORY EFFECT: They can be recharged without a negative memory effect, and can therefore offer maximum power even after hundreds of charge cycles.
3. Power
Let us now look at the two fundamental aspects to be considered in a battery-powered chainsaw: Power and working autonomy.
These aspects are indicated in the technical data of the machines with Voltage (V) and Amperage (A) respectively.
When talking about voltage, we mean the working power of the chainsaw; the higher the voltage of the electric motor, the greater the level of power output.
When talking about amperage, on the other hand, we mean the working range, so a higher amperage equals a longer working autonomy.
A third value, again concerning the power output of the engine, Watts (W), expresses precisely the power output of the motors of electric devices, or their batteries.
This value, however, is mainly indicated on electric machines, in battery-powered models it is almost never mentioned in the technical data or in the product information manual.
3.1 How to calculate Watts
This figure can be easily obtained through a simple multiplication by knowing the machine’s Voltage and Amperage:
W = V x A
Watt = Voltage x Amperage
Let us now take real examples to calculate watts using the formula above-mentioned.
As a first example, let us consider a battery-powered chainsaw powered by an 18 Volt, 4 Amperes battery,
the calculation to determine its power in watts is:
- 18 (Volts) x 4 (Amperes) = 72 Watt
What about a chainsaw with two batteries?
Consider a Worx chainsaw with two 20 Volts and 4 Amperes batteries.
The first thing to do is to make a preliminary calculation to obtain the total power of the machine. To do this, simply add up the voltage of the batteries supplied, thus:
- Electric chainsaws with 2x 20 V and 4 Ah batteries → Equals 40 V and 4 Ah.
We can now calculate the total watts of the machine with the multiplication above:
- 40 (Volts) x 4 (Amperes) = 160 Watt
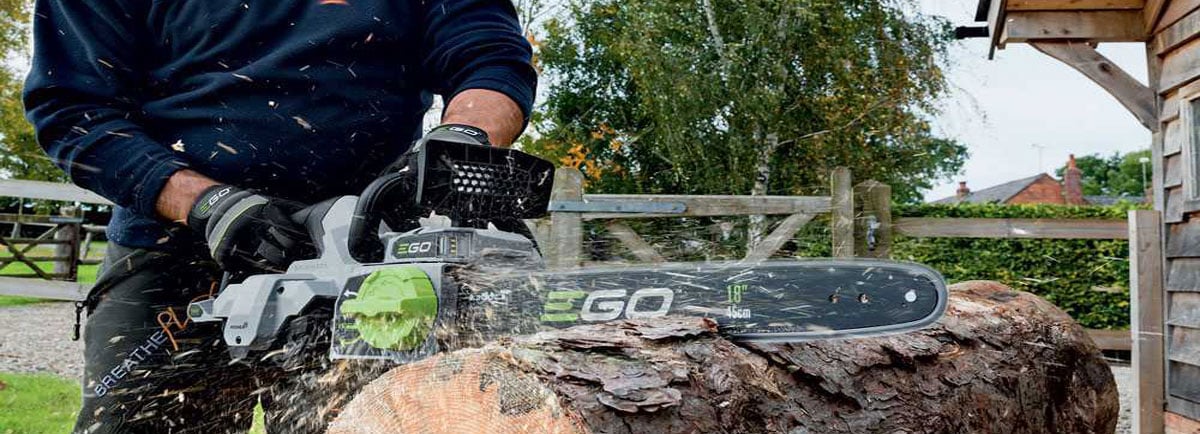
4. Cutting bars
The bar of a chainsaw is the part that holds the cutting chain in guide; its size varies depending on the type of use the machine is intended for and the power it delivers.
Let us then make a small breakdown of some bar length ranges and their actual use:
| Bar Length | Bar Size | Use |
| Up to 14 cm | Mini | Pruning |
| 15 to 19 cm | Very short | Pruning |
| 20 to 24 cm | Short | Pruning |
| 25 to 29 cm | Medium – Short | Pruning and Small Cuts |
| 30 to 34 cm | Medium | Pruning and Cutting |
| 35 to 39 cm | Medium – Long | Cutting and small-scale felling |
| 40 to 44 cm | Long | Cutting and felling |
| 45 to over 50 cm | Very long | Cutting and felling |
There are two different types:
- Standard Bar
- Carving Bar


The standard bar features an elongated, linear shape, is the largest bar and is used for most cutting operations.
The carving bar on the other hand, is smaller than the standard one and has a more tapered shape at the tip.
These features make it ideal specifically for precision cuts and pruning work, as the bar with this particular shape fits better into plants with dense and intricate branches. As a result you will avoid damaging branches close to the one you are pruning during the operation and have greater ease of movement.
5. The chain
Before carrying out cutting operations, it is important to know the correct way of mounting and tensioning the chain to avoid damaging the bar and performing unsafe and inefficient operations.
- The first thing to do is to check that the chain is fitted in the correct direction of rotation.
Chains in fact have only one cutting side, which is the one that has to make the cut.

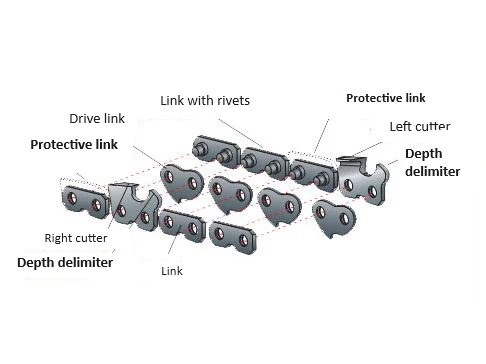
5.1 What does a chainsaw chain consist of?
- Again taking the picture above with the chain mounted in the correct cutting direction as a reference, at the bottom we find the drive links, the parts that enter the bar and are shaped like a hook (the numbered parts).
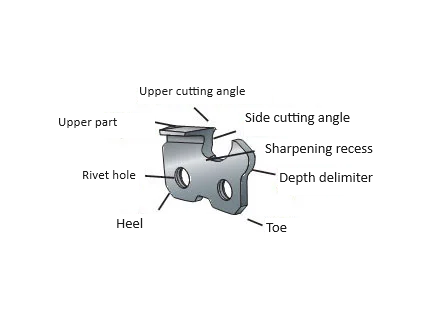
- The upper part of the chain, on the other hand, as we have just mentioned, is the part that physically does the cutting, and consist of a cutting part called the ‘tooth’.
The teeth are evenly distributed and are connected to each other by ‘links’.
- Another very important aspect to check is that the chain has the correct tensioning.
It must stick to the bar but not excessively so, otherwise there is a risk of braking the natural sliding of the chain and damaging the bar itself. - It is important to remember that with carving bars the chain must be less tensioned, in fact about half of the guide link must be visible in the bar guide. This is due to the lower radius of the bar, where excessive chain tension would create excessive stress.
As we have already seen, there are two different types of bars, and in turn, chains also have different characteristics.
Aspects that may vary are: The Pitch and the Thickness.
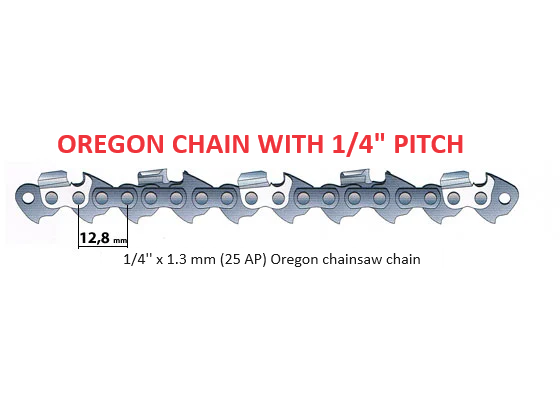
5.2 What is the pitch of a chain and how is it calculated?
The chain pitch is the distance, expressed in millimetres, between 3 consecutive rivets divided by 2.
Then simply measure the distance between them and divide the sum by two.
In the picture below we can see, for example, a chain with 1/4″ pitch, with a 12.8 mm distance between three rivets.

So let’s see what the ratios and equivalence are between chain pitch expressed in millimetres and chain pitch expressed in inches.
| Distance between 3 consecutive rivets | Chain pitch in millimetres | Chain pitch in inches |
| 12.80 mm | 6.40 mm | 1/4″ – .25 |
| 16.70 mm | 8.35 mm | .325″ |
| 19.20 mm | 9.60 mm | 3/8″ – .375″ |
| 20.60 mm | 10.30 mm | .404″ |
| 38.00 mm | 19.00 mm | 3/4″ – .75″ |
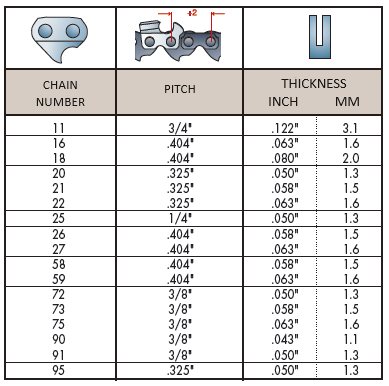
5.3 What is the thickness of a chain?
The thickness, on the other hand, is the part of the drive mesh that enters the bar shim.
Industry standards are .043″ (1.1 mm) .050 (1.3 mm), .058 (1.5 mm) and .063″ (1.6 mm) respectively.
In the pictures below we can see all the different factory chain thicknesses and how the pitch and thickness vary as the chain number increases.

Let us now see what are the various tooth sequences of a chain.
Three different sequences are available:
- Standard
- Semi-Skip;
- Skip.
Chains with a standard sequence of cutting edges guarantee excellent cutting performance, as they have as many teeth as possible, with each link being followed by a right and left tooth alternately.
Skip and Semi-Skip sequences, on the other hand, are found on replacement chains for low-end machines, are the cheapest and also have fewer teeth, for the same number of links, than standard sequence chains.

6. Safety clothing
To use a chainsaw correctly and safely, it is important, as we have seen, to properly mount every part of the machine, especially the chain, however it is also crucial to follow a safe operation technique, always working safely and in spaces devoid of dangerous obstacles.
Another fundamental aspect is the clothing one wears during operations, to effectively protect oneself from cuts and possible debris and cutting residues.
The main articles of clothing to wear are:

- Protection helmet;
- Noise-reducing earmuffs
- Cut Resistant gloves;
- Cut Resistant clothing
(Jacket, Dungarees, Trousers and Muffs); - Safety footwear.
In the picture above, we can see a typical outfit with the most classic protective clothing, but in addition to those, other types of clothing are also available to protect against cuts and debris, for example: Cut-resistant dungarees, safety boots and cut-resistant sleeves.


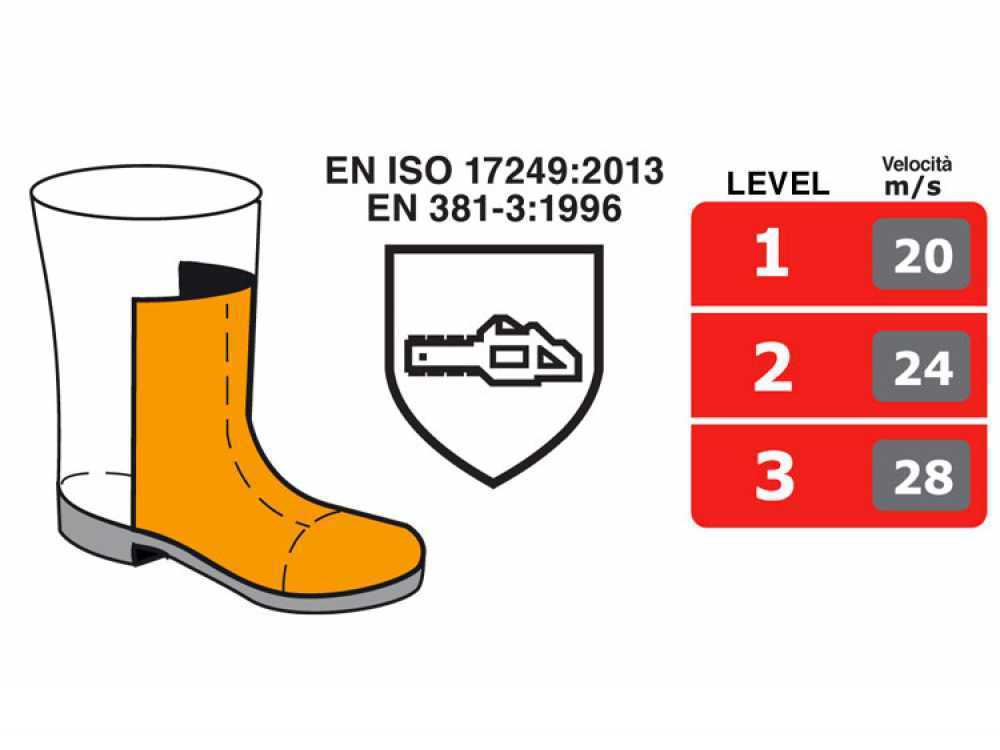
A key aspect to consider with cut-resistant clothing is the protection class.
This indicates the cut resistance of the article of clothing worn.
There are three different cutting classes, each indicating a degree of protection from the cutting blades during operation:
- Protection class 1: Indicates protection from the chainsaw cutting bars with chain cutting at 20 m/s speed.
- Protection class 2: Indicates protection from the chainsaw cutting bars with chain cutting at 24 m/s speed.
- Protection class 3: Indicates protection from the chainsaw cutting bars with chain cutting at 28 m/s speed.

7. Safety devices
Along with the appropriate cut-resistant clothing to wear, it is also important mentioning the safety devices already integrated on the machine, the most important one being the chain brake.
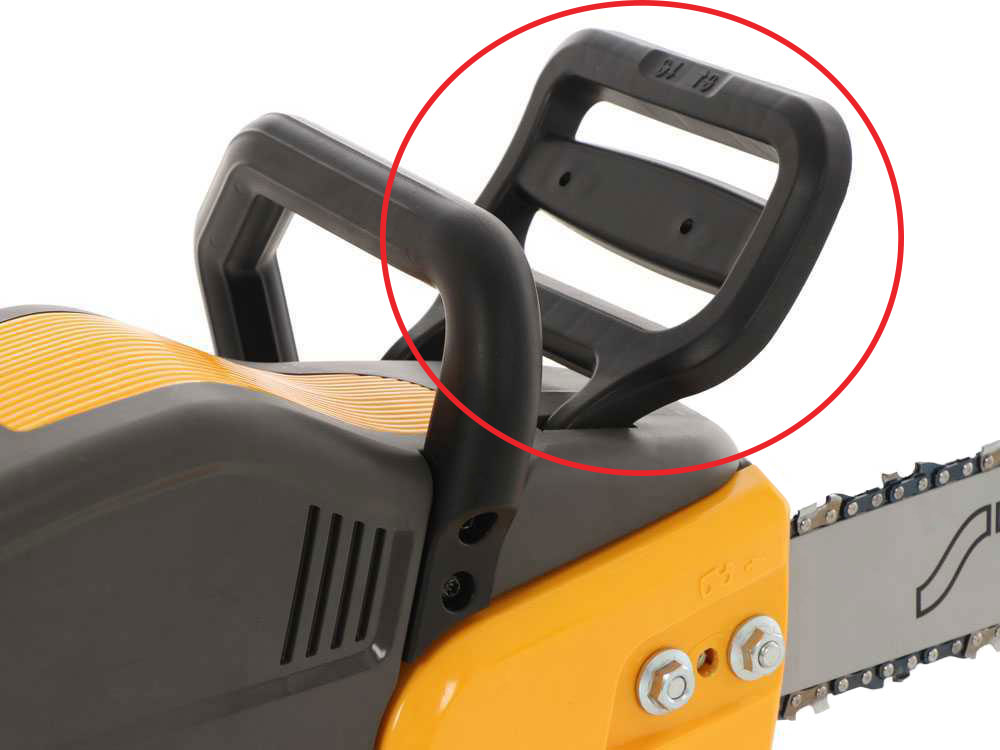

This is a safety system that stops the chain from sliding in case of accidental impact or jolting and is activated when the part in front of the handle (the one highlighted in red)is pushed forward.
Its operation is very simple: when the guard is moved forward, a metal ring tightens the clutch drum, blocking its action and immediately stopping the chain from sliding when necessary.