

A comprehensive guide on the main stages of tractor-mounted flail mower maintenance, with lots of useful tips, the various tasks to be carried out and the correct procedures for doing so.
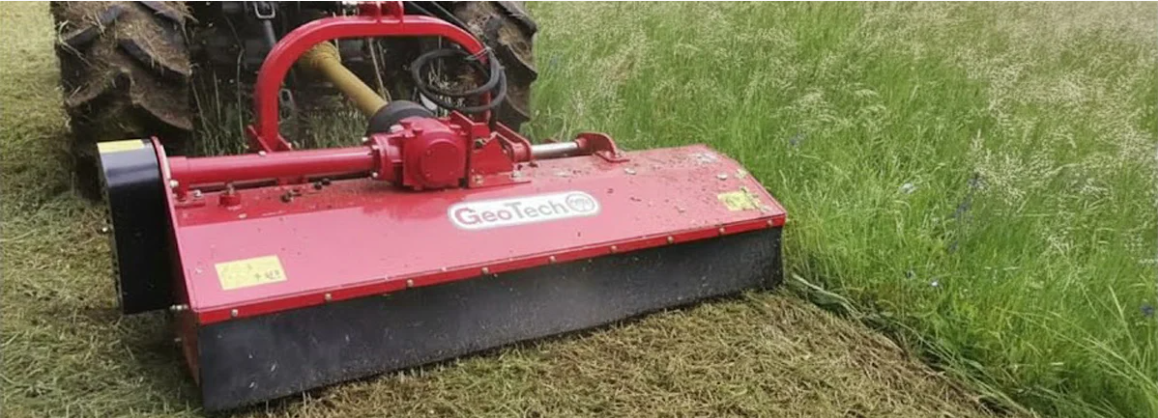
Tractor-mounted flail mowers are essential machines in agriculture and forestry for managing tall grass, brush, pruning residues and undergrowth. Sturdy and designed to work in even the most demanding conditions, these machines require constant maintenance to ensure optimal performance and a long service life. In this guide, we will provide a complete overview of the various maintenance phases, all the tasks to be performed and the correct procedure for each.
We can summarise the maintenance stages as follows:
- Frequent inspections: checks and interventions to be carried out regularly to keep the flail mower in good condition;
- Annual inspections: checks to be carried out annually, which do not need to be performed very frequently;
CONTENTS
1. Frequent Inspections
In this chapter, we will look at what checks to perform, how often and how to carry them out quickly and safely.
1.1 Lubrication
One of the first things to check is that the flail mower’s lubrication is adequate.
All the joints of the flail mower must be greased regularly, in particular bearings, pins, cardan joints and joints. Greasing keeps the mechanical movements smooth, protecting the parts from jamming or seizing and preventing corrosion.
The rotor bearings, i.e. the central shaft on which the mower knives or hammers are mounted, are among the most important lubrication points. These components operate at very high speeds and are subjected to constant loads and vibrations during use.
If not properly lubricated, they can overheat, become damaged or even seize up, causing serious damage to the machine.
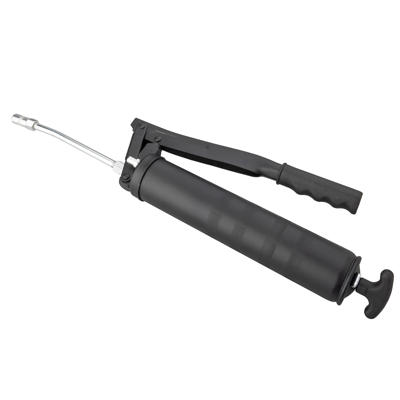
To perform this operation, a grease gun (also known as a grease syringe or grease pistol) is used, which allows the grease to be applied precisely to the designated points by connecting directly to the grease nipples distributed on the rotating parts of the machine.
Tip: Use a moderate amount of grease; 2-3 presses on the pump lever are usually sufficient.

Grease lubrication must be carried out every 6-8 hours of operation, after each wash or before long periods of inactivity.
It is important to apply the grease through the appropriate grease nipples until the old grease comes out, which is a sign that the cavity has been completely refilled.
We recommend using high-quality lithium grease that is resistant to water, dust and high temperatures to ensure long-lasting protective performance and consistent performance over time.
Tip: As for the rotor bearings, it is important not to use too much grease. These components should be lubricated according to the intensity of use of the machine.
1.2 Checking the wear status of the blades and replacing them if necessary
The cutting tools of a flail mower are one of the most crucial parts for efficient and uniform cutting.
Wear or damage to the blades can compromise the quality of the work and put additional stress on other parts of the flail mower.
The cutting system must be sharp and free of damage, chips, bends or cracks, which can not only reduce cutting efficiency but also cause irreparable damage if not replaced promptly.
Check that they are securely fastened, as excessive play in the rotation may also indicate the need for replacement.

In many models, the blades are reversible: if they are worn on one side only, they can be removed, rotated and refitted on the other side to extend their useful life.
If you notice that the blades are damaged or excessively worn, it is essential to replace them.
The blades can be sharpened with special tools such as grinders or belt sharpeners. If the deformation or wear is excessive, replacement is the best option to maintain operational efficiency and safety.
There are different types of cutting tools for flail mowers, each designed for a specific job. Cutting blades can vary depending on the type of flail mower and the type of material they have to deal with.
We can find:
- knives: suitable for cutting grass and small branches;
- hammers o toothed hammers, more suitable for coping with thicker and more resistant woody material.
The images below show examples of knives, hammers and toothed hammers in excellent condition, which are essential for ensuring effective and safe cutting depending on the type of material to be processed.


1.2.1 Checking the Fastenings
In addition to the condition of the blades themselves, it is essential to ensure that they are correctly fastened and that all components are in good condition.
Vibrations caused by the lack of any component can damage the flail mower’s mechanical parts, reducing service life and compromising safety during cutting operations.
Inadequate fastening of the hammers, caused by wear of the pin or bolt, may lead to detachment, resulting in risks to the operator and damage to the flail mower.
1.3 Cleaning

It is also important to clean the flail mower regularly to remove any material that accumulates during use, such as grass, branches or mud.
The flail mower blades are the primary components that collect material such as grass and leaves during operation; this build-up can reduce cutting efficiency at the next use.
In addition, excessive soil deposits can also be a sign of incorrect use of the machine: if you notice too much soil in the area of the hammers or on the frame, it is likely that the hammers are working too close to the ground. In this case, it is essential to check their height together with that of the rear roller. Under normal working conditions, these should be positioned approximately 4-5 cm from the ground.
Incorrect adjustment can accelerate wear on the cutting tools, hinder the smooth flow of shredded material and cause the machine to become clogged, resulting in reduced performance and increased fuel consumption by the tractor.
Check and remove any residue from the blades using a metal scraper or a sturdy brush. For more stubborn material, you can use a jet of water (preferably at low pressure to avoid damaging the bearings).
1.4 Checking the Condition of the Belts
The belts are the connection point between the tractor’s power take-off and the shredding assembly: they are responsible for the correct transfer of power to the rotor. Wear, incorrect tension or structural damage can compromise the performance of the machine, causing slippage, abnormal vibrations or, in the worst cases, sudden transmission failure.
If strong vibrations or abnormal shaking are felt during operation, there may be a problem with pulley misalignment, excessive mechanical play or even an unbalanced rotor. In such cases, it is advisable to stop using the flial mower immediately and carry out a thorough check of all transmission components, including supports, couplings, bearings and connecting shafts.
During each inspection, the following should be checked:
- Wear condition: cracks, splits, side abrasions or worn sections indicate that it is time to replace the belt.
- Alignment: the pulleys must be aligned with each other. Misalignment causes uneven wear, abnormal noises and an increased risk of breakage.
- Presence of debris or oil: dust, straw, soil and various residues can infiltrate the belt compartment and accelerate deterioration. Oil or grease, on the other hand, can make them slippery. After each use, it is advisable to blow or brush the inside of the protective casing and ensure that the area remains dry and clean.
2. Annual Inspections
Annual inspections are checks that do not need to be carried out regularly throughout the year, but can be performed just once, preferably at the end of the season or before a long period of inactivity. Their purpose is to assess the machine’s overall condition after months of work and to identify any signs of wear or anomalies which, if overlooked, could impair performance or lead to damage in the following season.
Annual inspections include:
- Checking the oil level in the gearbox;
- Checking the frame.
2.1 Checking the Oil Level in the Gearbox
The gearbox is one of the most important components in a tractor-mounted flail mower, as it transfers the power generated by the tractor’s power take-off to the flail mower’s rotor shaft. This component operates under continuous stress and at high speeds, which is why proper lubrication is essential to prevent premature wear, overheating or seizure.
Checking the oil level in the gearbox at least once a year or every 100 hours of use is a simple but crucial operation for the correct functioning of the machine. A low oil level or degraded oil can compromise the efficiency of the transmission, cause internal damage and drastically reduce the useful life of the gearbox itself.


How to check the oil level?
Here are the steps to perform this check correctly:

1. Locate the check plug: Find the oil level check plug in the gearbox.
It is usually located on the side of the gearbox and can be identified by a label or an oil symbol.
Refer to the flail mower’s user manual to identify the correct point.
2. Check the oil level: If the level is too low, top it up using the oil recommended in the operator’s manual. Use a hand pump or a funnel to add the oil slowly, and avoid overfilling the gearbox by adding it gradually. If, on the other hand, the oil is visible and reaches the lower edge of the inspection hole, the level is correct.
If you notice any oil seepage near the gearbox housing or along the drive shafts, you must act promptly before putting the machine back into service.
The image below shows a close-up of a gearbox with the three key points for oil maintenance highlighted for easy identification.

- Filler cap with vent valve: the cap located at the top is used to add new oil and also acts as a vent, allowing for proper internal ventilation and preventing the build-up of pressure or vacuum during operation.
- Level check cap: located in the centre, this cap allows you to easily check the oil level. It is important to ensure that the lubricating oil always reaches the correct level to guarantee adequate lubrication of the gears and prevent damage.
- Drain plug: located at the bottom of the gearbox, this valve is used to completely drain the oil, particularly during replacement or periodic maintenance operations.
In the absence of visible leaks, this check can be carried out on an annual basis, for example during the end-of-season service or before storage. A periodic inspection without any obvious signs of malfunction is more than sufficient to keep the gearbox in good condition and to prevent premature wear or mechanical failures.
2.2 Frame Check
Check for cracks, damage or signs of corrosion. Flail mower frames are generally sturdy, but rust or damage caused by impact can compromise stability.
Use a file or sandpaper to remove any traces of rust and paint the frame to protect it.
2.3 Belt Tensioning
Correct tensioning of the drive belts is crucial for the flail mower to function properly:
- Excessive tension can create excessive load on the transmission components, increasing fatigue and the risk of long-term damage. It can also compromise the system’s ability to protect the machine from overloads.
- Insufficient tension leads to belt slippage, resulting in loss of efficiency, overheating and premature wear of the belts themselves.
The belts can be accessed by removing the protective cover, which is attached to the side of the machine body, between the upper shaft and the rotor.

The drive belts always tend to slip slightly when rotating, especially during start-up.
This is normal and results in slight heating of the protective belt guard, which will feel warm to the touch during operation. Correct tension keeps this slippage at the right level, ensuring optimal operation.
To check the tension of the belts, you can apply light pressure with your hand on the back of the belt in the section not close to the pulleys. The movement should be about 1 cm.
If the belts move too much, the tension needs to be increased; if the movement is too limited, the tension is probably excessive.
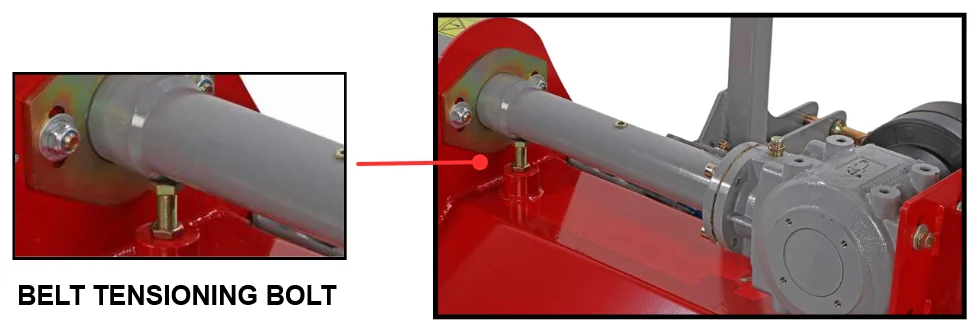
If the drive belt tension is insufficient, you need to adjust the appropriate bolt, which moves the drive shaft coming from the central box upwards or downwards. To adjust the tension, loosen the lock nut and tighten or unscrew the adjustment screw, usually located under the shaft itself.
A small adjustment, even of just one millimetre, can restore the correct tension. After making the adjustment, check the tension again to ensure it is optimal.
Belts have a finite service life, after which they must be replaced. If the belts appear heavily worn, frayed, or continue to slip even when correctly tensioned, they should be replaced (all of them) with belts of the same size.
2.4 Rotor Check
The rotor is the flail mower’s operational core: it withstands heavy loads, rotates at high speed, and works in close contact with abrasive materials such as grass, branches, stones, and plant debris.

What maintenance task should be carried out on the rotor?
- Cleaning: Remove any grass, mud or wood residues that accumulate on the rotor and at the height of the rotor’s side bearing supports. Use compressed air or water (preferably at low pressure) to avoid infiltration into the bearings. Allow to dry thoroughly before storing the machine.
- Checking bolt tightness: Check that all bolts securing the hammers to the rotor are tight. Vibrations during operation can loosen them, with the risk of detachment during use.


2.5 Transmission System Maintenance
The flail mower’s transmission system is the set of all mechanical components that transfer power from the tractor to the implement and, inside the machine, from the gearbox to the rotor. Depending on the model, the transmission may include a cardan shaft, gearbox (reducer), pulleys, belts, shafts and bearings.
Extraordinary maintenance should be carried out at least once a year and whenever anomalies are detected, such as unusual noise, abnormal vibrations, loss of performance, or localized overheating.
Likewise, the drive belts are subjected to significant stress during operation and tend to wear over time. Check that the belts are not loose, damaged, or excessively worn; if you notice cracks, breaks, or clear signs of wear, replace them before using the flail mower again.
3. Recommendations
In addition to the routine, annual and extraordinary maintenance cycles, it is important to pay attention to certain elements of the flail mower that affect operator safety and the durability of the machine itself. These checks are not always included in standard inspections, but they represent good practices to adopt regularly, especially in the case of frequent or professional use.
3.1 Checking the PTO Shaft Universal Joint
The PTO shaft universal joints are essential components that ensure smooth power transmission between the tractor and the flail mower. They must always be well lubricated and in perfect condition: a damaged or seized cross journal, or one showing excessive play due to wear, can cause vibrations and metallic noises or, in the worst cases, lead to joint failure during operation—resulting in downtime and a safety risk for the operator.
What to check?
- Check that there is no abnormal play or irregular movement.
- Check that grease is present and well distributed at the lubrication points.
- Check that the yokes show no signs of wear or cracks.
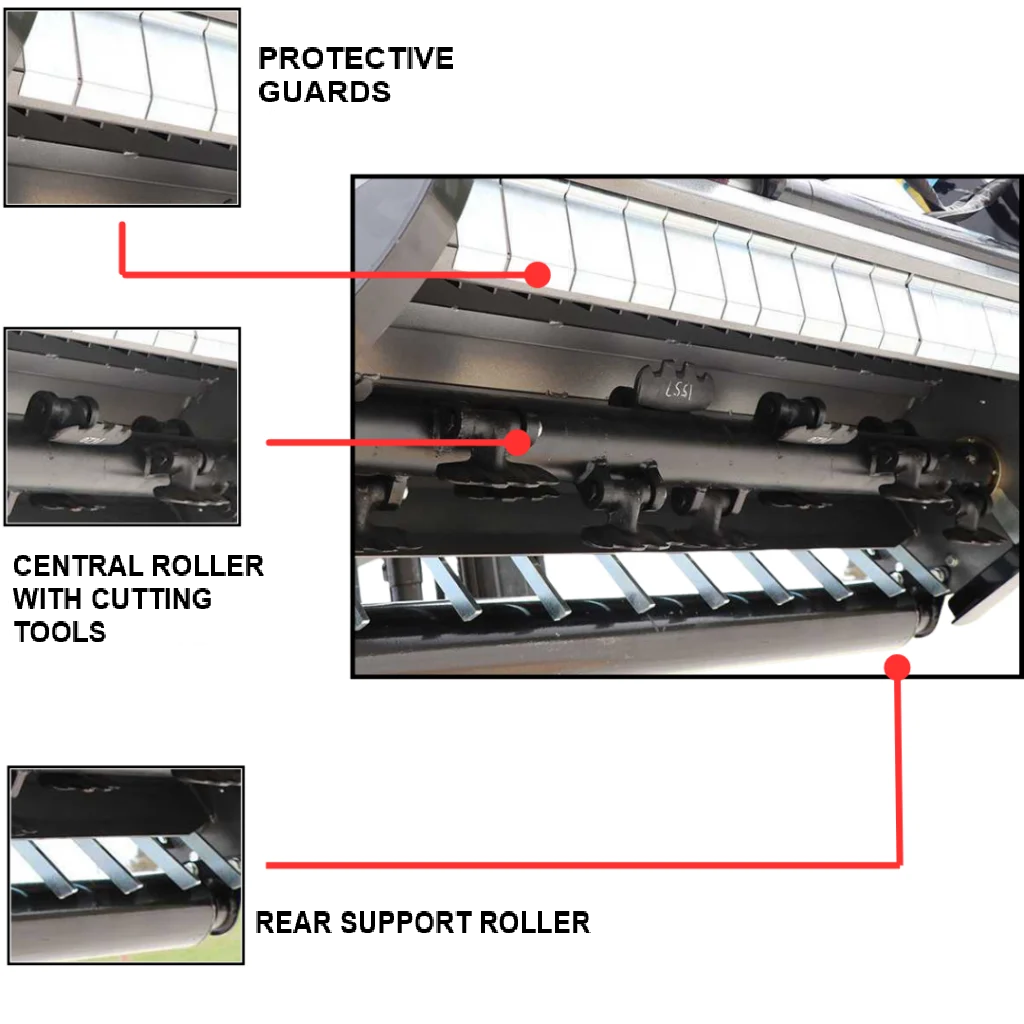
3.2 Checking the Integrity of the Protective Guards
Protective guards are used to prevent debris (such as stones, clods of soil or pieces of wood) from being thrown out during operation. If they are damaged, too rigid, broken or missing, they pose a real risk to the operator and anyone nearby.
The guards must be:
- Intact and mobile.
- Securely attached to the frame, without tears or excessive bending.
- Free to oscillate to adapt to the terrain without jamming.
The absence or malfunction of the guards can cause:
- Dangerous splashes of material at high speed, especially on dry or gravelly ground.
- Accidental damage to persons, animals or property near the work area.
- The risk of non-compliance with safety regulations in a professional context.
3.3 Checking the Cardan Joint Guard
Another often overlooked element is the cardan joint guard. This cover (often made of rigid plastic with rotating casings) prevents the operator from accidentally coming into contact with rotating parts.
Ensure that:
- Ensure that the cover is intact and securely fastened..
- The guards rotate freely around the joint.
- The safety chains are connected to the tractor and the mulcher to prevent the casing itself from rotating.
A missing or blocked protective device can cause serious accidents, especially when getting off the tractor or inspecting the machine while it is still running.
4. Safety During Maintenance
Maintaining the flail mower requires care and caution to avoid accidents and injuries.
Here are some essential tips to ensure your safety:
- Always switch off the tractor engine: Before starting any type of maintenance, make sure the engine is switched off and remove the ignition key to prevent accidental start-up.
- Wear personal protective equipment (PPE): Use sturdy gloves, safety glasses and safety footwear to protect yourself from possible cuts or flying debris.
- Check the stability of the flail mower: If you are working under the flail mower or on heavy components, always use suitable supports (such as axle stands/jack stands) to prevent the tool from accidentally falling.
- Use appropriate tools to handle and clean the blades when cleaning or maintaining them.
- Safe working area: Ensure that the working area is clean, well lit and free of obstacles. Avoid slippery surfaces and try to work in stable conditions.
5. Frequently Asked Questions from Our Customers
An overly tight drive belt can strain the transmission components, increasing the risk of breakage.
Lithium grease is used to lubricate and protect metal mechanical components, reducing friction and preventing corrosion.
The main cause may be incorrect rotor balancing or the absence of one or more hammers or knives.
The most practical method is a visual inspection, or alternatively the use of a belt tension gauge.
The correct type of oil to use is always specified in the relevant operator’s manual.
The rear roller allows the shredded material to be discharged behind the machine.