A comprehensive guide on all stages of lawn tractor maintenance, with lots of useful tips on what needs to be done.
The guide on the main operations of Ride-on Mower Maintenance
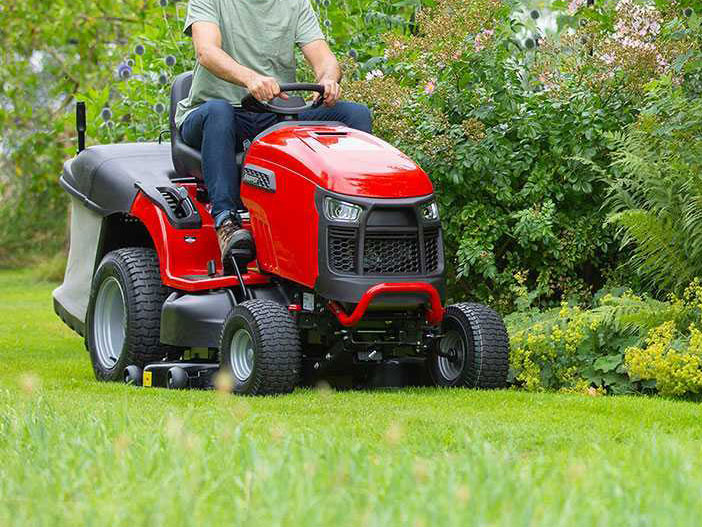
The ride-on mower is among the most popular machines in the gardening world, as far as cutting and lawn care is concerned. It is mainly used in the spring, summer and fall seasons, performing demanding cutting operations and often over large areas, it is very important therefore, to perform proper maintenance at the beginning, during and at the end of the mowing season, so as to leave the machine and its components always in an efficient state.
In the guide we will look specifically at all the various maintenance tasks that need to be done for all the various stages of the season.
CONTENTS
- Ride-on mower maintenance: The three stages
- 1. Maintenance for the new mowing season
- 2. Routine maintenance throughout the season
- 3. Maintenance for winter storage
- 4. How to lift the ride-on mower?
- 5. Maintenance for battery-operated models
- 6. Problems and solutions
- 7. Some tools needed
- 8. Frequently asked questions from our customers
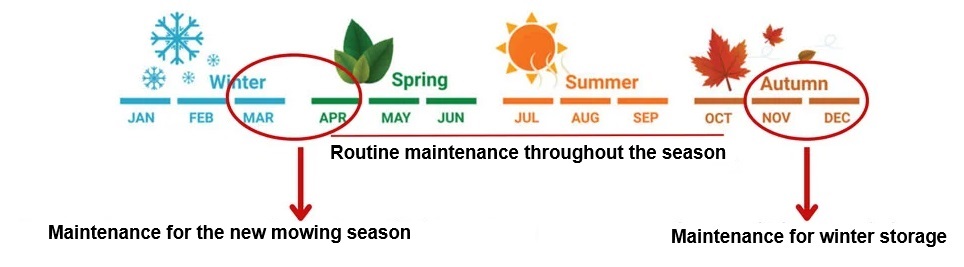
Ride-on mower maintenance: The three stages
Proper maintenance of a ride-on mower requires targeted and specific interventions, depending on the different stages of the season you are in.
We can identify three main stages in the maintenance season:
- Maintenance for the new mowing season: Maintenance that is performed in March-April to prepare the ride-on mower for the new season;
- Routine maintenance throughout the season: Maintenance that should be carried out regularly throughout the season and after each use of the ride-on mower;
- Maintenance for winter storage: Maintenance that is done in November-December before storing the ride-on mower for the winter months when it will be unused.

We will look specifically at all maintenance steps, the periods when they should be performed, and all the work required, starting with maintenance for the new mowing season and ending with winter storage.
Below is a small summary diagram of the various maintenance steps according to the time of year.
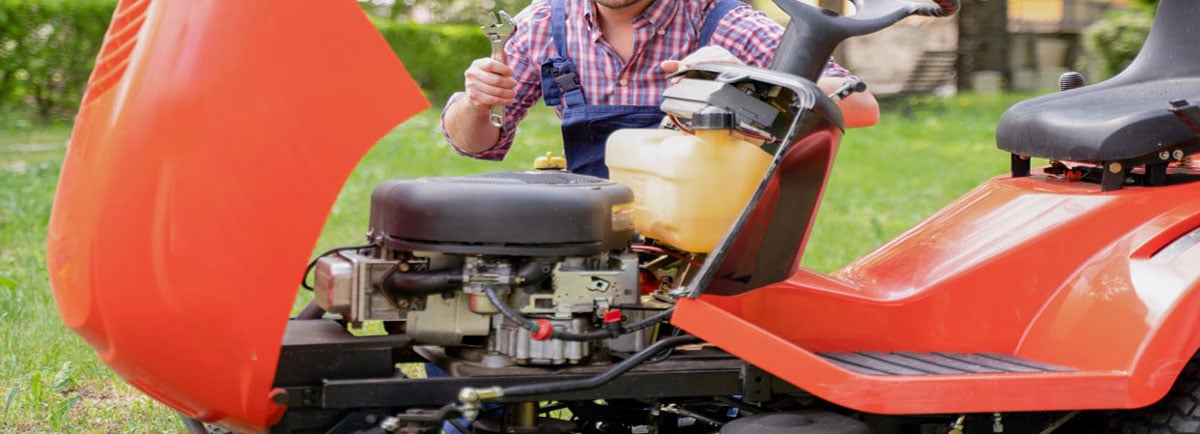
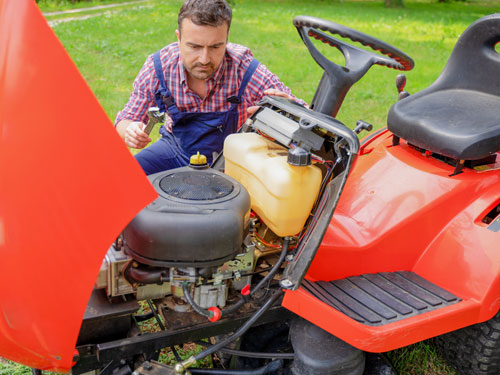
1. Maintenance for the new mowing season
In this chapter we will look at what work needs to be done between late winter and early spring to prepare the ride-on mower for the mowing season.
The first start of the season is a delicate time for all machines with internal combustion engines, since they have been idle for a long time.
So there are precise maintenance tasks to be done on our ride-on mower:
- Fuel renewal;
- Connecting or charging the battery;
- Engine oil replacement;
- Air filter replacement;
- Spark plug replacement;
- Electrical connections check;
- Tire check.
1.1 Fuel Renewal
In understanding maintenance for winter storage we will discuss the importance of completely emptying the tank and properly storing the fuel throughout the winter in the appropriate canisters.
If this step has been followed then, first the tank should be refilled with properly maintained fuel or fresh fuel.
If, on the other hand, fuel has been left in the tank all winter, it should be replaced with fresh fuel to avoid engine starting problems.
1.2 Battery connection
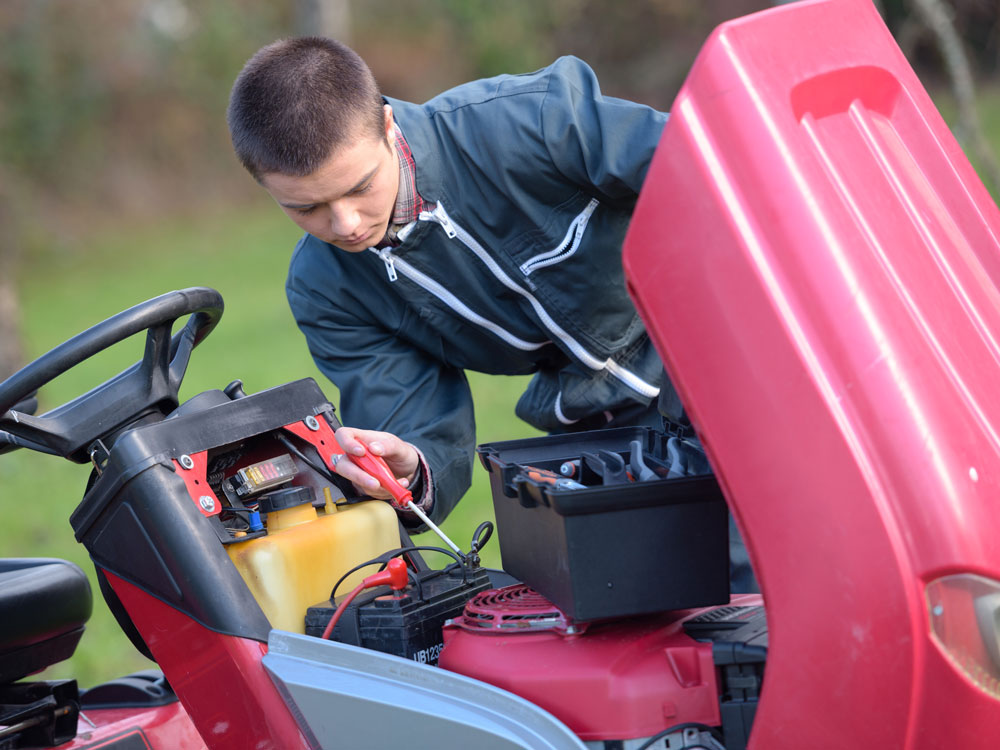
Regarding the battery, let’s assume that before storing the ride-on mower throughout the winter, it is essential to disconnect it and store it in a sheltered, dry place.
In this case as well, in the chapter on winter storage maintenance we will see specifically why it is so important to disconnect it from the ride-on mower for the winter and how to store it in the correct way.
However, this standard is often not met, so what should we do if we leave the battery connected?
Let’s try to summarize what to do at the beginning of the season in both cases:
- If the battery during the winter season has been disconnected from the machine, stored in a sheltered, dry place, perhaps connected to a battery maintainer all the time, simply rehouse it in its designated compartment, reconnect it, and check its actual charge.
- If, on the other hand, it has been left connected to the machine all the time, it should be recharged first, since it will surely have lost all its charge; its functioning should then also be checked, since remaining completely discharged for long periods of time tends to lose all its functionality, often needing to be replaced.
1.3 Engine oil replacement
Regular engine oil changes are most important to ensure that the engine works properly and provides the best performance. When preparing for mowing season, the oil needs to be replaced, since by sitting for several months in the machine it has now lost its lubricating properties.

In fact, the oil should be completely replaced at least once a season even if the machine sits idle and is not used.
During continuous use of the machine, such as during the summer season, on the other hand, the oil should be changed at least every 50 hours of operation.
This time interval may also change depending on the type of effort the engine performs.
If you use the ride-on mower on particularly challenging terrain you will have more engine overheating than if you do classic lawn work.
In this case, the engine oil is likely to need to be replaced even before the 50 hours indicated earlier.
What is the best time to change engine oil?
The most recommended time to change engine oil is early in the season.
It is important to point out that the specific oil to be used for the ride-on mower, frequency and replacement procedure are given in the instruction manual.
Engine oil should then also be checked and, if necessary, topped up periodically, regardless of how the ride-on mower is used, so as to improve engine efficiency, reducing engine wear and ensuring better performance with each use.
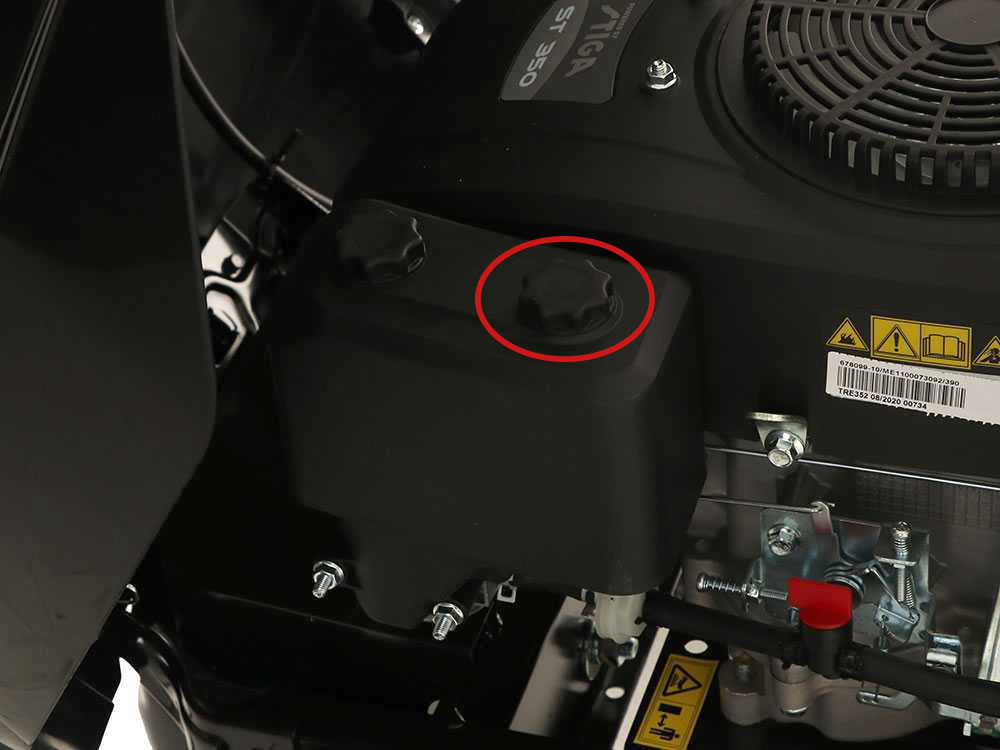
How to check the engine oil level and top it up if necessary?
To check the engine oil level, simply unscrew the cap of its container, located near the engine, and pull out the dipstick, verifying that the level never exceeds the MAX mark.
Checking the engine oil level is essential because the wrong amount can cause irreparable damage to the engine. In fact, too low a level can destroy the engine due to poor lubrication of its parts; on the other hand, too much oil can create air bubbles and likewise cause lubrication deficiencies.
How to change the engine oil?
Changing the engine oil is one of the most delicate stages of maintenance, requiring precise steps and small steps to complete the operation at its best:
- Place a collector under the oil drain plug;
- Turn the drain plug counterclockwise and open it;
- Remove the dipstick for inspection;
- Drain the old oil completely;
- Reapply the drain plug and turn it clockwise to close it;
- Slowly pour new oil through the dipstick hole;
- Finally, start the engine at idle to check for leaks.
1.4 Air filter check or replacement
Another important operation to carry out at the beginning of the season is to replace the air filter to ensure proper filtration and better engine operation.
When restarting the tractor from the storage phase, it is in fact possible to find the air filter more or less dirty, more or less damaged, therefore depending on how the filter looks one can proceed in two different ways:
- If the filter is in good condition and only dirty, simply clean it of any dust or debris;
- If, on the other hand, the filter is in poor condition with obvious signs of wear, it must be replaced with a new one.
Let’s see for this case as well the main steps to be followed, for its proper replacement:
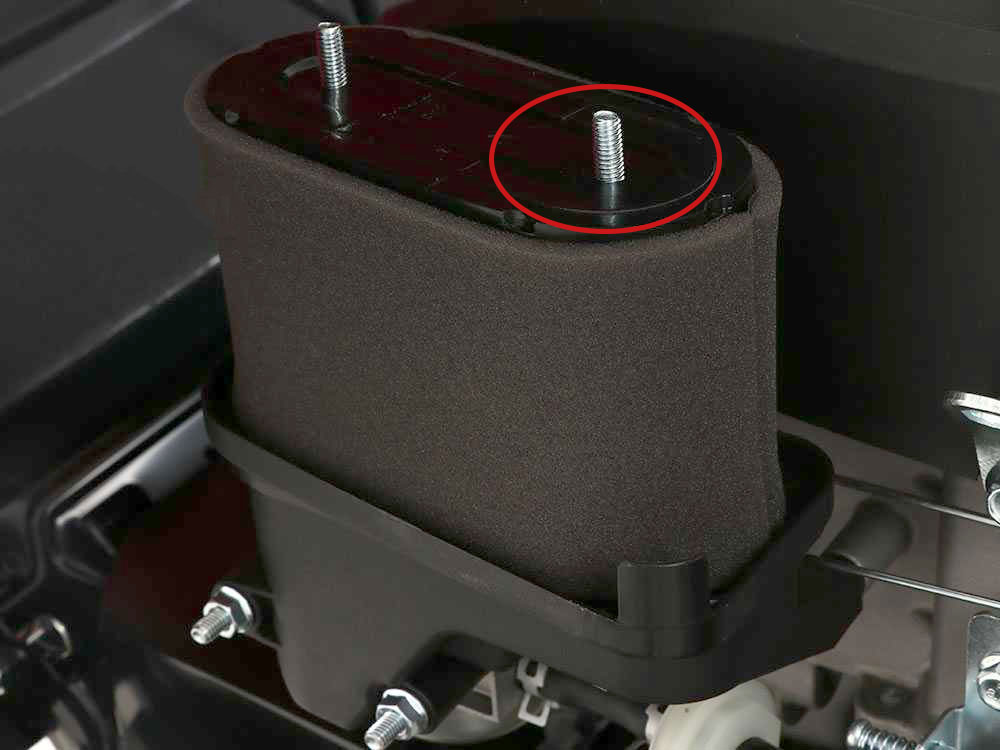
- The engine hood has to be opened. This is because the filter is always located on the side of the ride-on mower engine.
- The knobs that secure the protective cover must be loosened and the cover then removed.
- The filter must be removed from its housing.
Usually the filter is housed with two metal bars inside that allow its proper placement within the protective casing.
In this case, simply pull out the old filter and replace it with a new one. - As a final step, the cover must be reattached and the knobs tightened properly.
1.5 Spark plug check or replacement
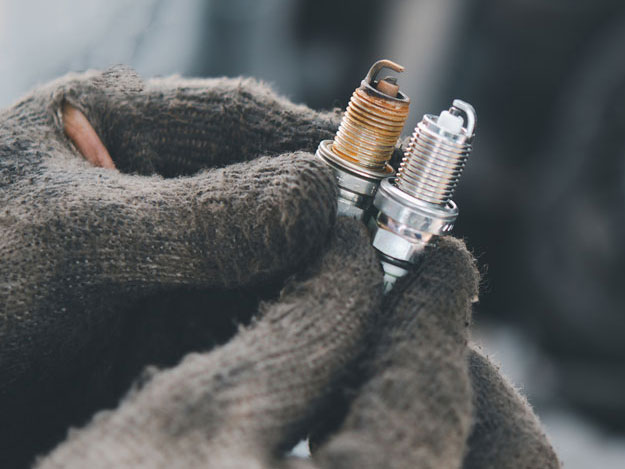
Checking and possibly replacing spark plugs is another maintenance task to be carried out at the start of the season.
Spark plugs that are clean and in good condition make starting the engine quick and easy, which is why it is important to check their condition regularly and replace them when necessary.
Similarly to the air filter, the condition of the spark plug should also be checked following the mower’s standstill period.
If the spark plug is found to be slightly dirty or with a few deposits after the standstill period, simply clean it.
If, however, the spark plug is found to be excessively damaged or in poor condition, it must be replaced.
How to replace them?
Replacing them is not a very complex procedure, but very specific steps must still be carried out, which for the inexperienced could be a not inconsiderable obstacle.
So let’s see what are the main steps to check the condition of a spark plug and possibly replace it:
- First, the spark plug, which is located near the engine compartment, must be located;
- Remove the spark plug cap;
- Remove the spark plug with a jointed spanner. To unscrew the spark plug, a an anti-clockwise movement is required. The spark plug, especially if it has never been pulled out, will show slight resistance to the action of the spanner. At this stage it is important to perform firm but not too forceful movements, otherwise there is a risk of breaking the upper part of the spark plug;
- Once removed, it can be replaced with a new spark plug.
Once the new spark plug has been placed, proceed with an initial manual rotation, and then tighten correctly, again using the jointed spanner.
Even for the re-insertion phase, it is important to make sure that the spark plug is inserted correctly, in order to avoid serious damage to the engine.
1.6 Checking electrical connections
Given the long period the ride-on mower has been idle, all electrical connections and their proper functioning should be checked, from the front headlights, to the various indicator lights in the control panel.
1.7 Tire check
Lastly, the inflation and flattening state of the tires needs to be checked.
Being stationary for several months in fact, the tires not only tend to deflate but also flatten under the weight of the ride-on mower itself (as happens for example for cars after a long period of standstill).
It may be a good solution then, to leave the ride-on mower slightly raised from the ground and without the tires mounted, so as to avoid the flattening.
However, this step cannot always be done, either due to lack of available space or the necessary tools.
It is very important then, to make sure that once we have restarted our ride-on mower the pressure of the tires is correct and that they are running smoothly and evenly.
What is the correct tire pressure?
The pressure should be around 1.5 bar in all four tires. This figure is always given in the user manual.
2. Routine maintenance throughout the season
In the previous point of the guide, we looked at the maintenance work to be done at the beginning of the season, but what are all the routine maintenance tasks instead?
By routine maintenance throughtout the season, we refer to all the work that needs to be done regularly during the months of use of the machine to constantly check the efficiency of all its parts.
Maintenance varies according to hours of use, a check should be done at least every 50-60 hours of work, but as we said before it is always better to check the condition of the cutting deck and outer shell after each work session.
We can sum up into routine maintenance work:
- The air filter check;
- The spark plug efficiency check;
- Checking the engine oil level;
- Checking tire pressure;
- Battery control;
- The cleaning of the outer shell and the cutting deck;
- Perform a blade engagement check;
- Checking the condition of the collection basket or discharge baffle.
2.1 Air filter efficiency check
Checking the efficiency of the air filter is important to ensure proper engine operation.
In fact, the air filter can cause several problems not only when it is too worn and old, but also when it is merely dirty.
Therefore, it is important to check its condition periodically and clean it at least every 50 working hours.
How to tell if the air filter is dirty?
Signs of a dirty air filter are sudden power loss and an abnormal increase in fuel consumption.
How to clean a lawn mower’s air filter?
For a paper air filter, it will be sufficient to blow it with the air from a compressor.
One tip is to blow from the inside out so that impurities do not remain in the filter.
In the case of a sponge filter, on the other hand, it can be washed with liquid soap and water, and once it has dried completely, it can be reassembled.
2.2 Spark plug efficiency check
Another important routine maintenance to avoid starting problems is definitely to check the efficiency of spark plugs. It is recommended to check its condition every 6 months.
During routine maintenance, spark plugs should be checked for fouling or signs of dirt in order to continue to ensure maximum performance; if spark plugs are dirty, they should be cleaned.
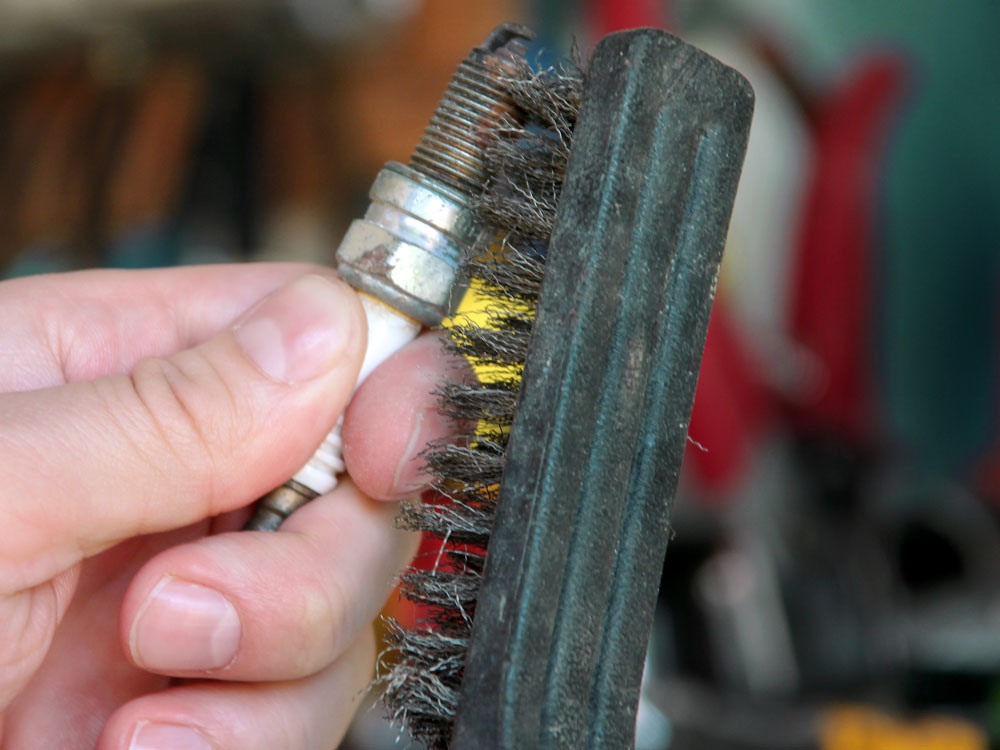
A special brush with steel bristles and a spray cleaner specifically for candles should be used to effectively clean it.
How to clean the spark plugs of a ride-on mower?
Oil and dirt residues should be removed from the housings, and a brush with steel bristles should be used for the threads that can remove most of the residues.
During this operation, one should not only focus on cleaning the spark plug specifically, but also the area around it, to prevent residue and impurities from getting into the combustion chamber once it is pulled out.
2.3 For maintenance maniacs…
Are you a maintenance maniac and like to take care of your ride-on mower in great detail to the point of fanaticism?
Then this chapter is the one for you….
Here specifically, are all the steps for complete maintenance of your ride-on mower without neglecting any aspect.
The maintenance work to be done after about 50 hours of operation can be summed up as checks on the condition of the various parts of the ride-on mower with the exception of the engine oil, which must be replaced:
- Checking and cleaning the air filter;
- Engine oil change;
- Checking tire pressure;
- Checking the battery charge level, and charging if necessary;
- Clean the outer shell and cutting deck;
- Perform a blade engagement check;
- Check the condition of the collection basket or discharge baffle.
After about 100 hours of operation, on the other hand, maintenance work is more demanding, because it no longer includes only a check and cleaning phase, but also replacements of the parts most subject to wear and tear on the ride-on mower, such as the air filter.
So let’s see how maintenance work changes:
- Replacing and no longer just cleaning the air filter;
- Engine oil change;
- Checking tire pressure;
- Checking the battery charge level, and charging if necessary;
- Clean the outer shell and cutting deck;
- Check the condition of the blades and their sharpness;
- Perform a blade engagement check;
- Check the condition of the collection basket or discharge baffle.
| Maintenance work | After 50 hours of work | After 100 hours of work |
| Tires | Pressure control | Pressure control |
| Air filter | Checking and cleaning | Replacement |
| Engine Oil | Engine oil change | Engine oil change |
| Electrical connections | Check proper operation | Checking for proper operation |
| Battery | Checking the battery and charge level | Checking the battery and charge level |
| Outer shell | Checking and cleaning | Checking and cleaning |
| Cutting system | Control of blade engagement | Checking the engagement of blades and their state of sharpness |
3. Maintenance for winter storage
We have now reached the end of the season, between the months of November and December where we enter the third phase of maintenance, that of preparing the ride-on mower for winter storage.
This last phase is essential to continue to keep the machine’s performance efficient for the following seasons.
What maintenance work needs to be done before its winter storage?
- Empty the tank;
- Disconnect the battery;
- Clean the cutting deck;
- Storage.
3.1 Emptying the tank
Before storage, it is important to remove the fuel from the tank to make it easier to empty the carburetor. Standing still in the tank throughout the winter will in fact deposit sticky substances and fuel residues, which are harmful to the engine.
If it is to be preserved, special additives should be added throughout the winter so that these residues do not accumulate, otherwise new fuel will have to be inserted at the beginning of the next season.
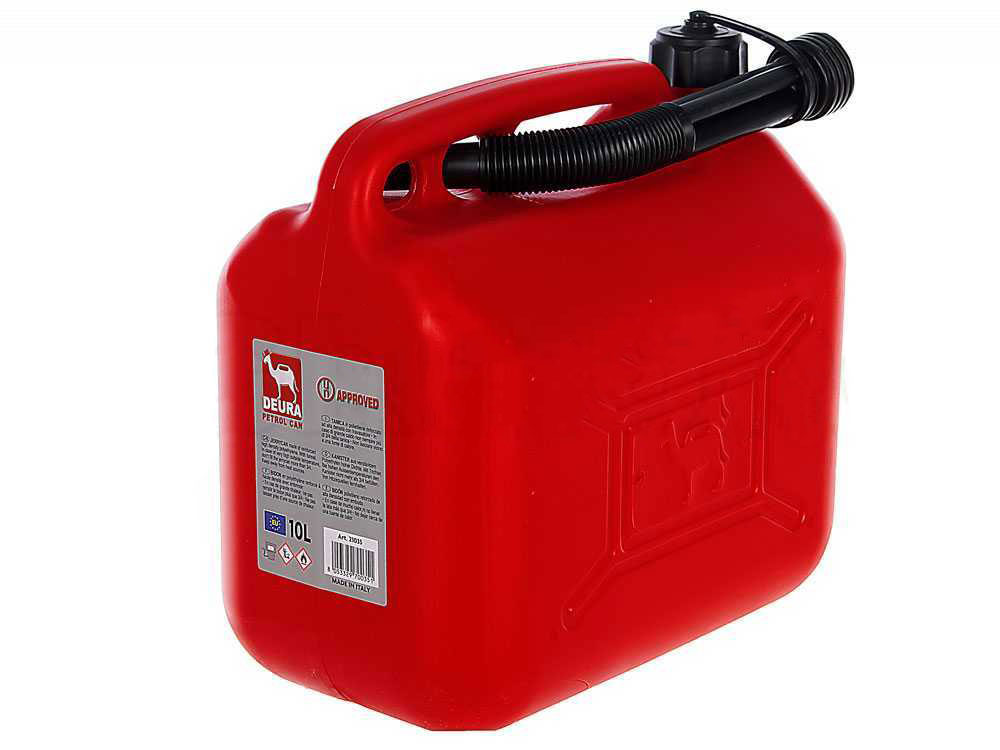
Special plastic fuel canisters are available for proper storage.
These canisters are made of thick plastic to prevent accidental holes and are red in color to prevent light penetration.
3.2 Disconnect the battery

Before the machine’s storage period, the battery should be disconnected; the battery always remains slightly energized even if the ride-on mower is turned off and not in use, discharging over time.
By remaining completely discharged for a long period, it tends to lose all its functionality, then often needing to be replaced at the beginning of the next season.
When you decide to remove it, it should also be cleaned of dust and other debris accumulated during the season, charged and stored in cool, dry places, and then reconnected the following season.
The ideal solution, would be to keep it connected to a maintainer, nowadays already built into most modern batteries, which will maintain its status and charge all the time.
How do you properly remove a battery?
- First, the battery must be located, which is usually located either under the driver’s seat or on the sides of the ride-on mower;
- The NEGATIVE cable, which is black in color, should be disconnected first;
- The POSITIVE cable, colored red, should then be disconnected;
- The battery must be taken out of its housing.
3.3 Checking and cleaning the cutting blades
Cleaning and maintenance of the cutting deck: Remove grass, leaves or other materials to prevent wear and tear on the body and blades.
To perform this cleaning and maintenance step, it is strictly necessary to lift the ride-on mower, so that the blades and cutting deck, located at the bottom of the machine, can be conveniently reached.
A special attachment should be used to complete this procedure: The hydraulic lifter, the use and operation of which we will see in the next section of the guide.
The cutting system and blades should be cleaned carefully, to avoid buildup and encrustation of leaves and soil residue, so cleaning after each cutting session is recommended.
All the more reason before leaving the ride-on mower unused throughout the winter months, it is important to leave the cutting deck and blades clean and in good condition.
How to clean the cutting deck?
Specific accessories are available for cleaning, such as underbody scrapers, which are made with a special semi-curved shape that allows them to adhere perfectly to all corners of the bodies.
For more cleaning then, you can wash the cutting deck and blades directly with a stream of running water.
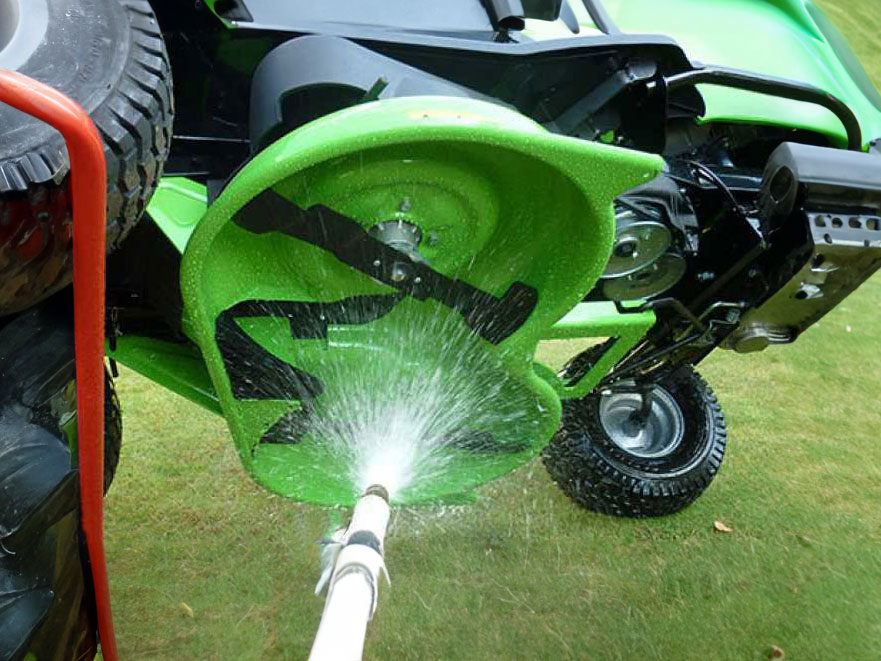
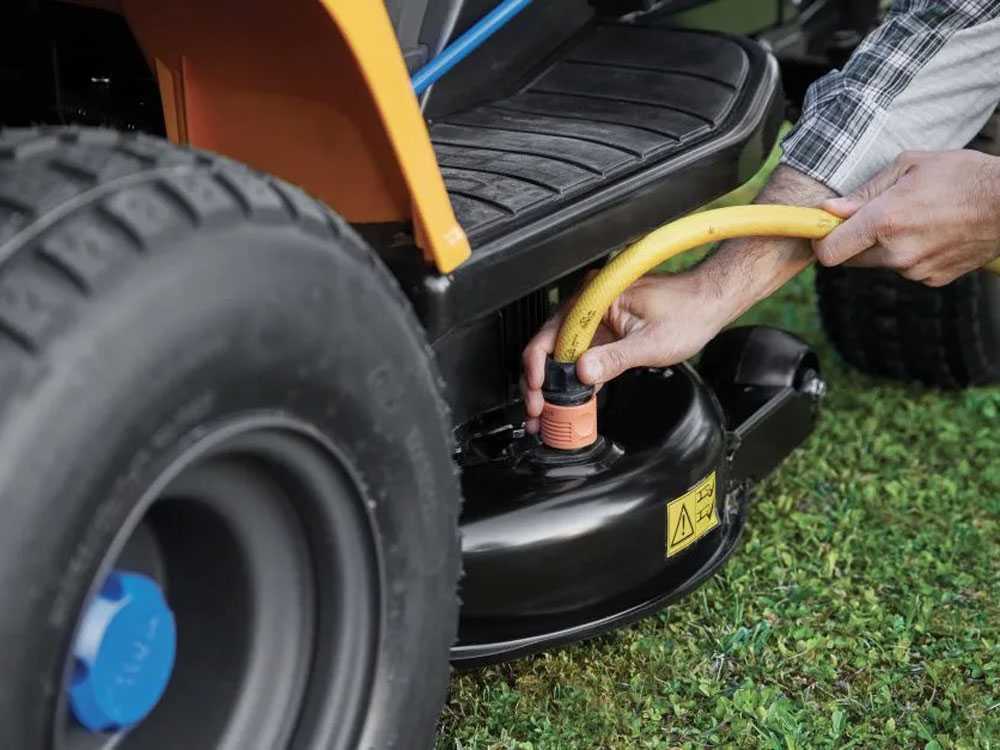
Some models, on the other hand, have a washing system where you do not have to lift the ride-on mower.
In fact, the cutting deck is equipped with a wash fitting to which a water hose can be connected so that the deck and blades can be washed with the ride-on mower directly on the ground.
In this way, all that is needed is to feed water into the fitting while rotating the blades with the engine running to perform an optimal wash.
The great advantage of this cleaning method is that you do not have to lift the ride-on mower with the lifter.
Once the blades and cutting deck have been cleaned, it is also advisable to inspect their condition.
How to check their condition and wear and tear?
- First, the cutting deck should be placed in the servicing position;
- You can go on to check the condition of the blades for wear or damage.
If the blades are damaged or poorly sharpened, they are replaced or sharpened. - Finally, when replacing or just inspecting, the blade bolts should always be checked for tightness with the specific torque.
3.4 Storage of the ride-on mower
The last step before completing this stage is to store the ride-on mower, which should be covered with a special protective cover if you do not have a garage or otherwise sheltered space.
This is a great help in protecting it from cold, weather, dust and moisture.

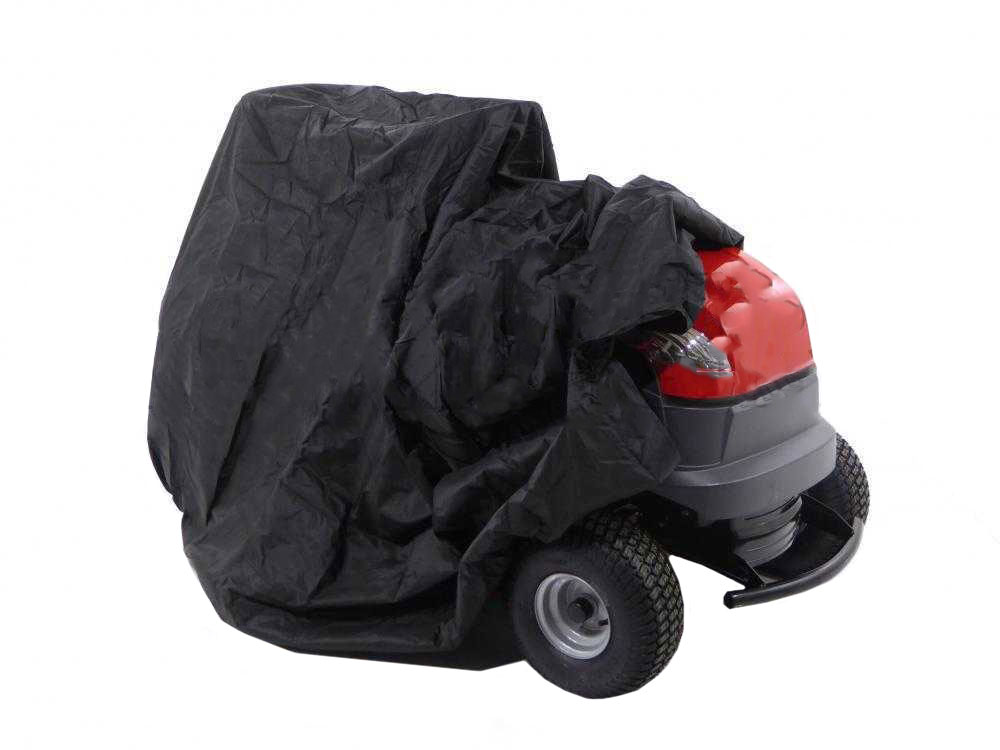
Available in various sizes to fit all ride-on mowers, from riders to flail mowers.
Tip: the tires of a ride-on mower after a long storage flatten under the very weight of the machine (as happens with cars).
That’s why it is advisable to store the ride-on mower a position slightly elevated from the ground and pull out the tires, to precisely prevent them from flattening and deflating.
4. How to lift the ride-on mower?
To perform some of the operations listed above, such as cleaning the cutting deck and blades, it is necessary to lift the ride-on mower.
But how to lift a ride-on mower that starts from a minimum weight of 130 kg in the smallest models up to even 400Kg?
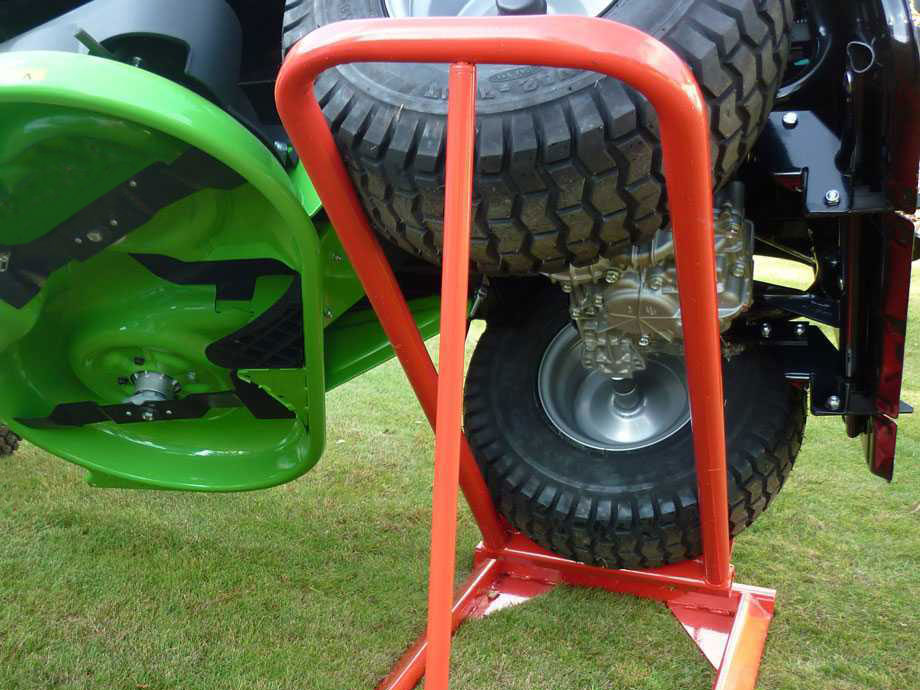
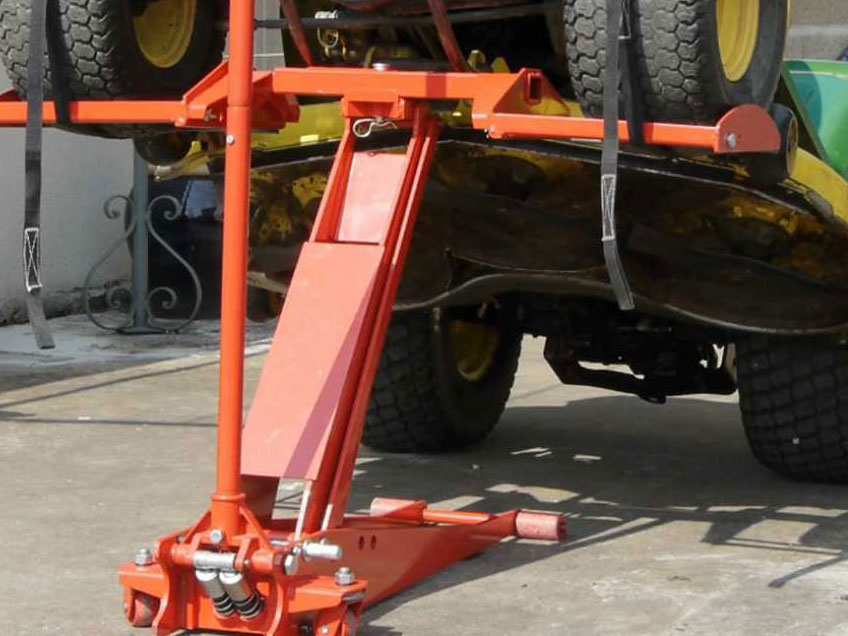
Through the use of a special hydraulic lifter for ride-on mowers.
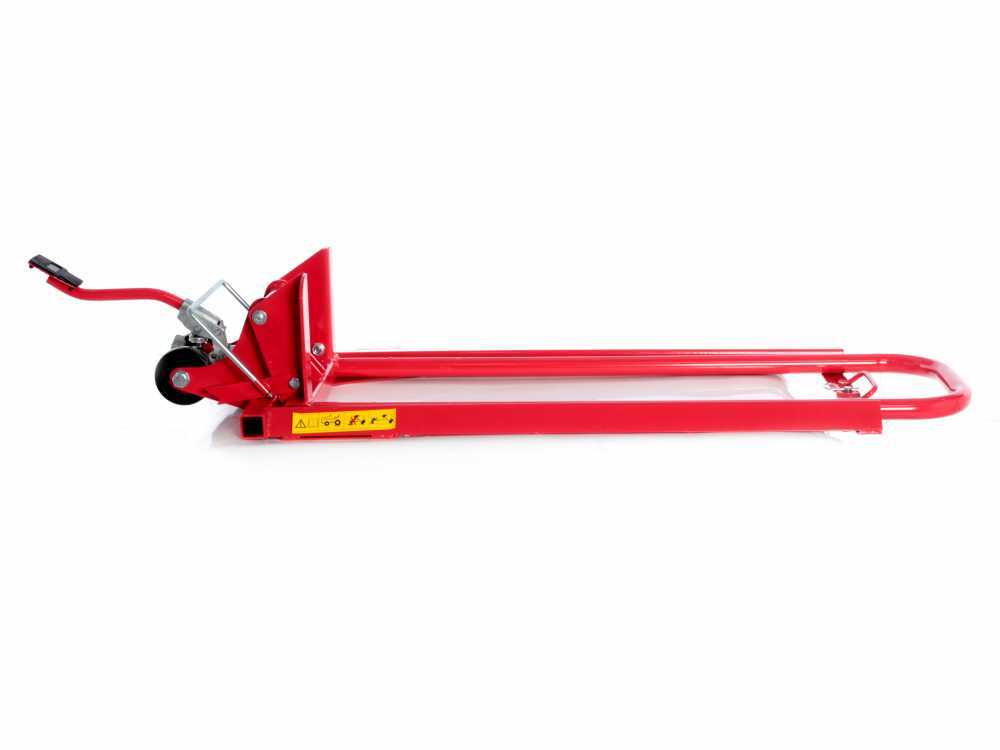
The lifter then, represents an essential element for all the maintenance operations we have seen, but how does it work?
Its operation is mainly based on a foot pedal, which through a hydraulic cylinder allows the machine to be tilted easily and effortlessly.
Its use is very simple: just place it on the ground and place the rear tires of the ride-on mower between the two special bars.
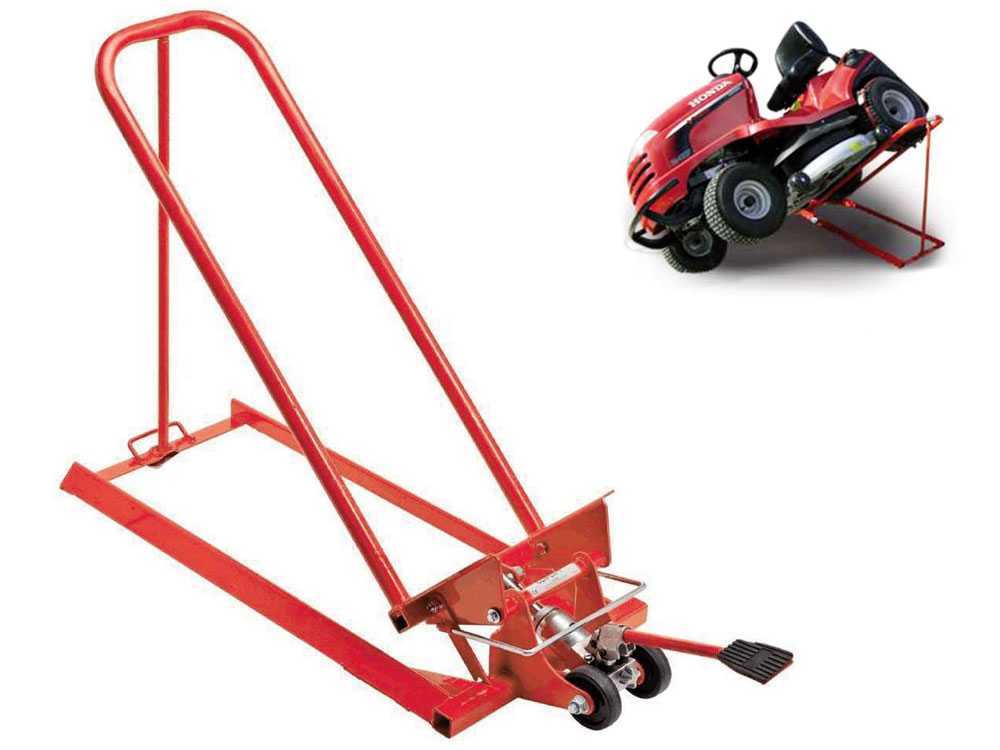
IMPORTANT: Choose the direction in which to tilt the ride-on mower based on the position of the fuel and oil tanks to avoid liquid overflow.
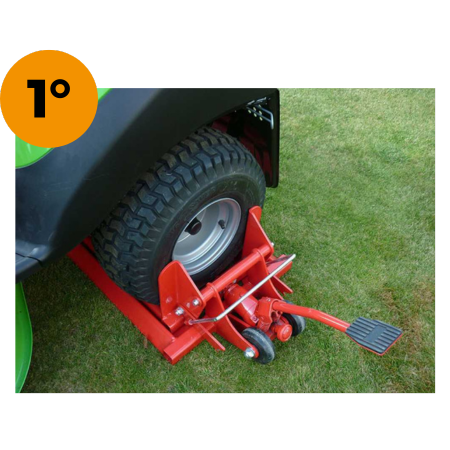
How to lift a ride-on mower?
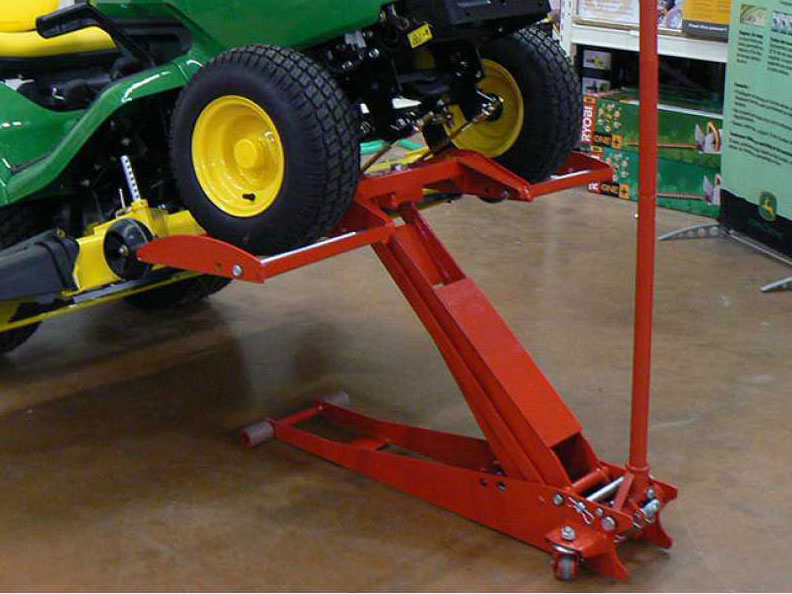
Since lifting a large and heavy machine such as a ride-on mower represents a very delicate operation, let’s look at all the steps, to do it correctly and safely:
- Place the rear tires of the machine in the space of the lifter;
- Press the foot pedal to raise the machine to an angle of about 45°.
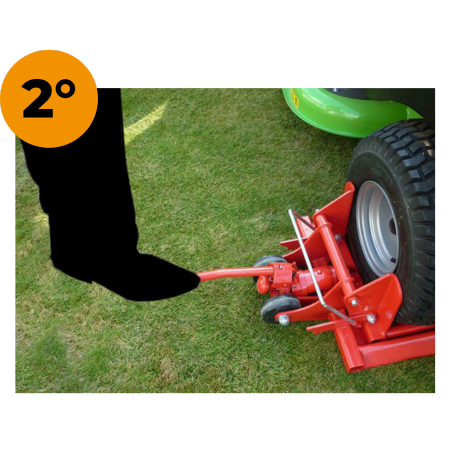
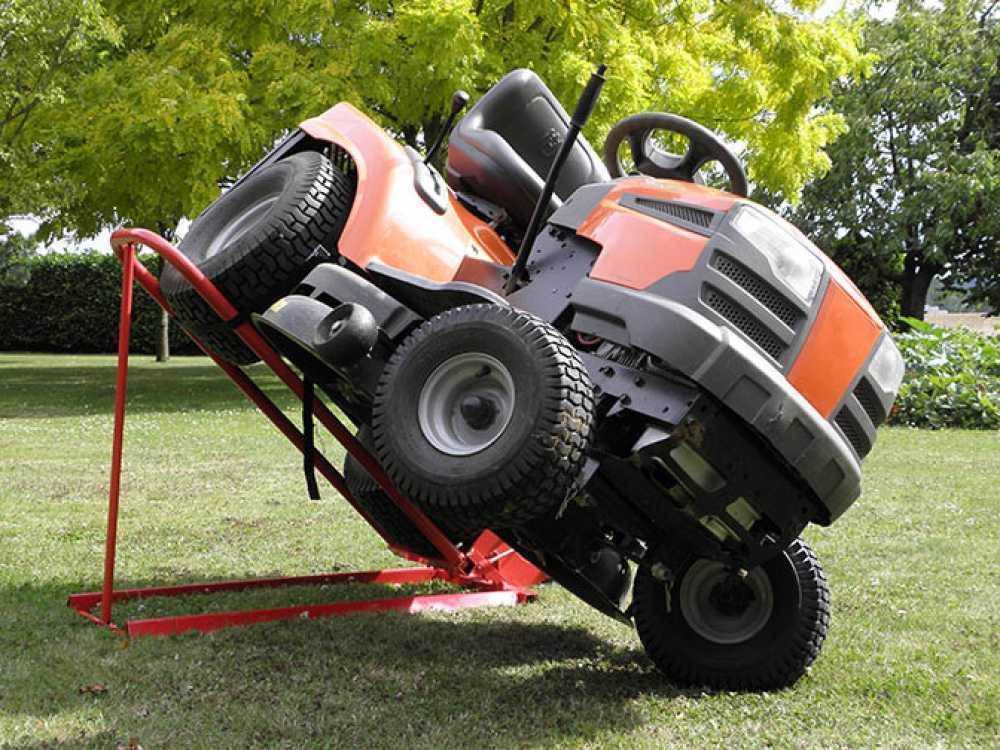
Once maintenance is completed, the ride-on mower is lowered:
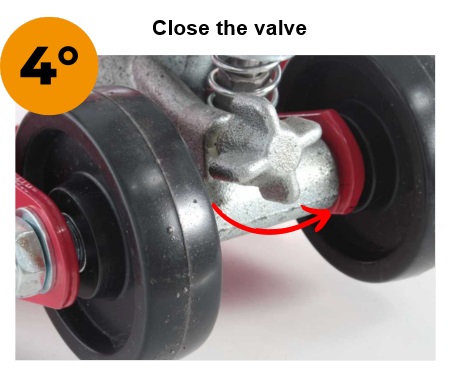
- To lower the lifter, the valve that regulates the pressure of the hydraulic cylinder, located between the two displacement tires, must be opened;
- Once the machine is back with the tires on the ground it must be moved off the lifter;
- Finally, the valve used to lower the ride-on mower should be closed again to prepare the lifter for the next operation.
Professional lifters do not always allow the ride-on mower to be lifted from the rear tires, thus tilting the machine sideways.
Models can also be found that lift the front of the ride-on mower.
Below is a tutorial video showing all the steps involved in using an hydraulic lifter for ride-on mowers.
5. Maintenance for battery-operated models
Maintenance for battery-powered ride-on mowers is somewhat less demanding, given the absence of an internal combustion engine, but still requires some important precautions:
- Full battery recharge;
- Check the machine for damaged or worn parts;
- Checking the condition and inflation of tires, same as for models with internal combustion engine;
- Place it in a clean, dry area, and possibly cover it with a protective sheet.
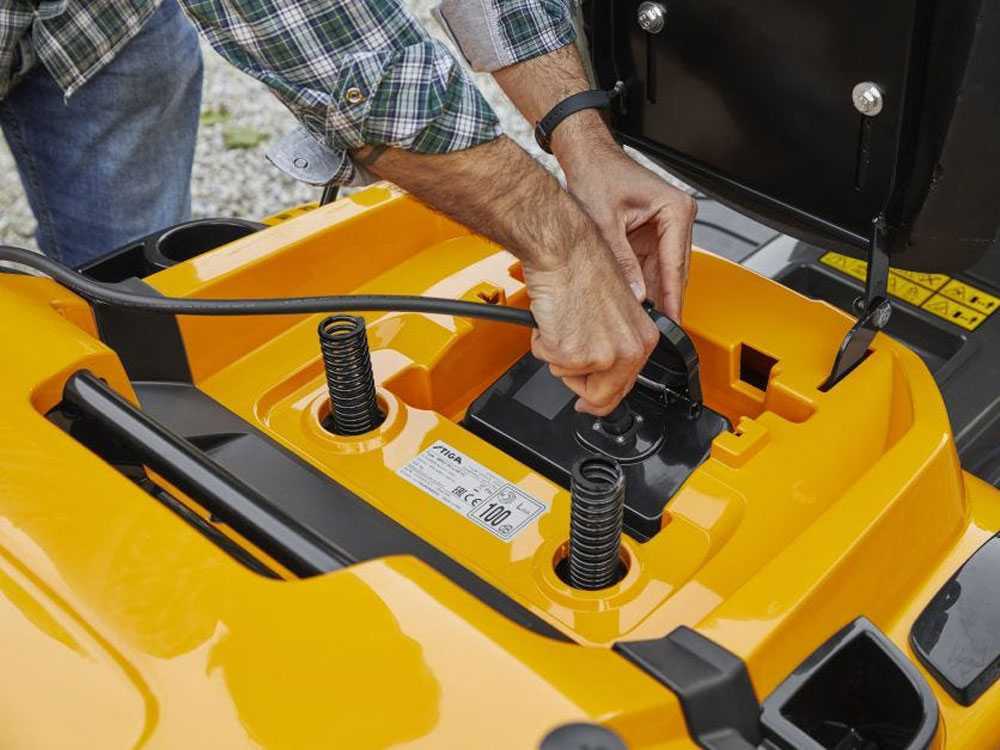
With this category of ride-on mowers, it is very important to keep charging the battery when the machine is not in use, especially in cold weather, so that it does not remain discharged for a long time.
For proper maintenance, the battery should be charged at least every 2 months of non-use.
6. Problems and solutions
| Problem | Cause | Remedy | |
| Petrol-powered ride-on mower | Failure to start | Low Battery | Charge the battery by following the manual |
| Lowered cutting deck | After using it, raise the cutting deck otherwise the next time the machine will not start | ||
| Difficult startup | Old fuel | Use fresh fuel, especially after winter storage | |
| Dirty or damaged spark plugs | Check and, if necessary, replace spark plugs | ||
| Dirty air filter | Check and, if necessary, replace the air filter | ||
| Battery-powered ride-on mower | Failure to start | Connected charger | Disconnect the charger, with the charger connected the ride-on mower will not start |
| Cutting deck activated | If the cutting deck is on, the machine will not start for safety reasons. | ||
| Low Battery | Check that the battery is fully charged and disconnect the lawn mower from the charger |
7. Some tools needed
In order to perform all these maintenance tasks, several tools are needed for the various operations,
Let’s see specifically what they are and their main use.
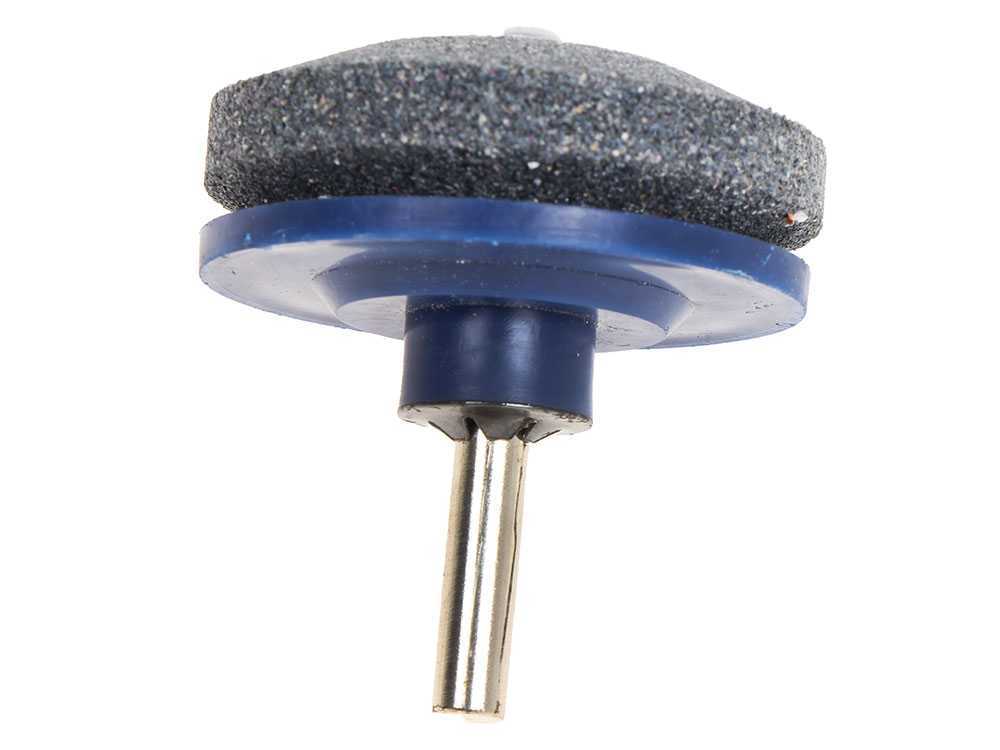
- The blade sharpener makes it quick and easy to sharpen cutting deck blades.
It should be attached directly to the screwdriver or drill and will be ready for use immediately.
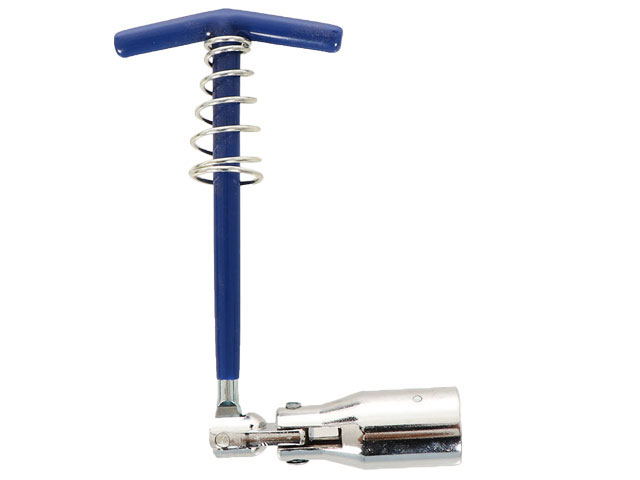
- The jointed spark plug wrench, is to be used to remove and reattach the spark plug. They differ in the different sizes of the connections, according to which they fit various models of spark plugs.
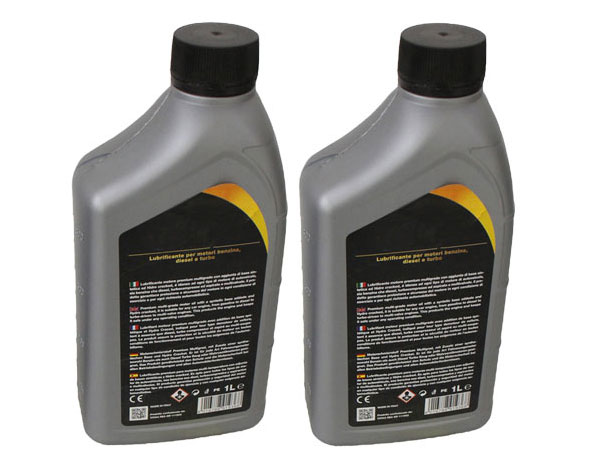
- Engine oil, which should be changed periodically, serves to perform a lubricating and cleaning action.
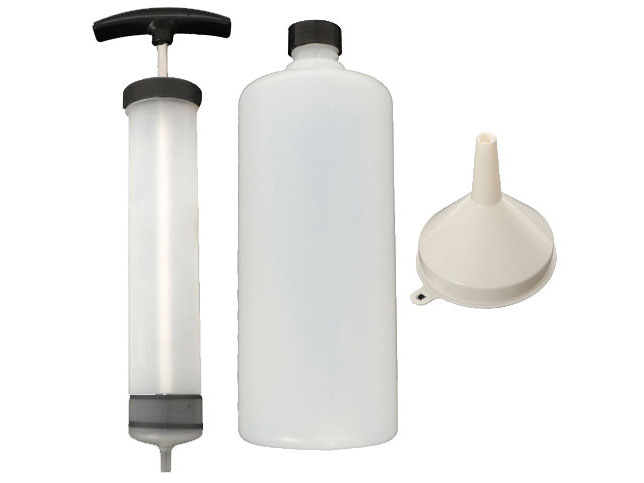
- The engine oil replacement kit includes a syringe for suctioning oil from the engine, a bottle for storing used oil for disposal, and a funnel for replacement.
8. Frequently asked questions from our customers
An oil that has the characteristics specified by the manufacturer, formulated for use on garden machinery, and that is suitable for the outside temperatures in which the machine works.
The most common reasons are old fuel that may have clogged the carburetor, dirty or damaged spark plugs. In battery-powered models, however, the status and charge of the batteries should be checked.
All four tires should be inflated to a pressure of about 1.5 bar.
A specific lubricating oil for this type of engine, with good detergency and dispersion.
By using the specific dipstick.
The blades of the ride-on mower can be cleaned by hand with a specific scraper or with a direct jet of water.